Communications
Support Units
Training & Conferencing
Applications
10 Photography Tips for Social Media
By: Melissa Johnson | August 11, 2022
Taking photos with your smartphone to post on social media? Here are 10 tips you can use to help you take better photos!
1. Think About Your Background
Not all backgrounds are created equal. When you are taking a photo to post on social media, think about what is going on in the background. Try to avoid messy areas, garbage cans, and clutter, if possible. Aim to either have very little going on in the background (for example, a blank wall or clutter-free area) or allow your background to help tell the story in your photo.
Here are two examples of what I am talking about:
Single-Subject Photos
The photo below emphasizes the subject by having a fairly clean and clutter-free background. To use this technique, look for a mess-free area for your subject to stand in front of.

Image description: Arkansas Cooperative Extension Service Vice President Dr. Bob Scott smiles and holds up a container of honey during an educational livestream on beekeeping called Live at the Hive, in which entomologist Dr. Jon Zawislak and Dr. Scott extracted fresh honey from one of Dr. Zawislak's beehives.
Multi-Subject Photos
The photo below uses the background to help tell the story of what is happening in the scene. This method is all about layering and finding the right angle to show what is happening in both the foreground and the background.

Image description: A behind-the-scenes shot from the Arkansas Home Grown & Homemade video series in which Videographer Matthew Magdefrau of Arkansas Farm Bureau looks through a camera at FCS Mentor Leigh Ann Bullington and FCS Agent Chris Roofe who are giving a food demonstration. This is the first video in a series, and in this video, Leigh Ann and Chris made a summery peach and spinach salad.
2. Take Candid Shots
Don't be afraid to take candid shots. Not every shot has to be posed! In fact, it can often tell a better story when the photo is candid, as opposed to a posed group photo, for example. While you are getting footage for social media, try to remember to get photos of the action while it is happening. Below are examples of candid shots:

Image description: Howard Co. Family & Consumer Science Agent Jean Ince uses a food processor to make a sauce for her handmade ravioli during a pasta-making workshop at the University of Arkansas Pulaski Technical College of Culinary Arts and Hospitality.

Image description: Water Quality Educator John Pennington thins inland sea oat from the rain garden at the Arkansas Cooperative Extension Service State Office in Little Rock during an educational Rain Garden Maintenance event.

Image description: Garland Co. Family & Consumer Science Agent Alison Crane smiles while spooning a cheese mixture onto rolled pasta that will eventually become ravioli during a pasta-making workshop at Pulaski Technical College of Culinary Arts and Hospitality.
3. Check the Lighting
Lighting can easily make or break a photo. Check your lightsource and make sure it's the best you can use at the time of the shoot. Natural lighting is always the best, so face your subject toward or near a window or even move outside, if possible.
If you are using a window for your natural lighting, make sure that you (the photographer) are standing between the window and the subject, and that the face of your subject is standing in the light from the window.
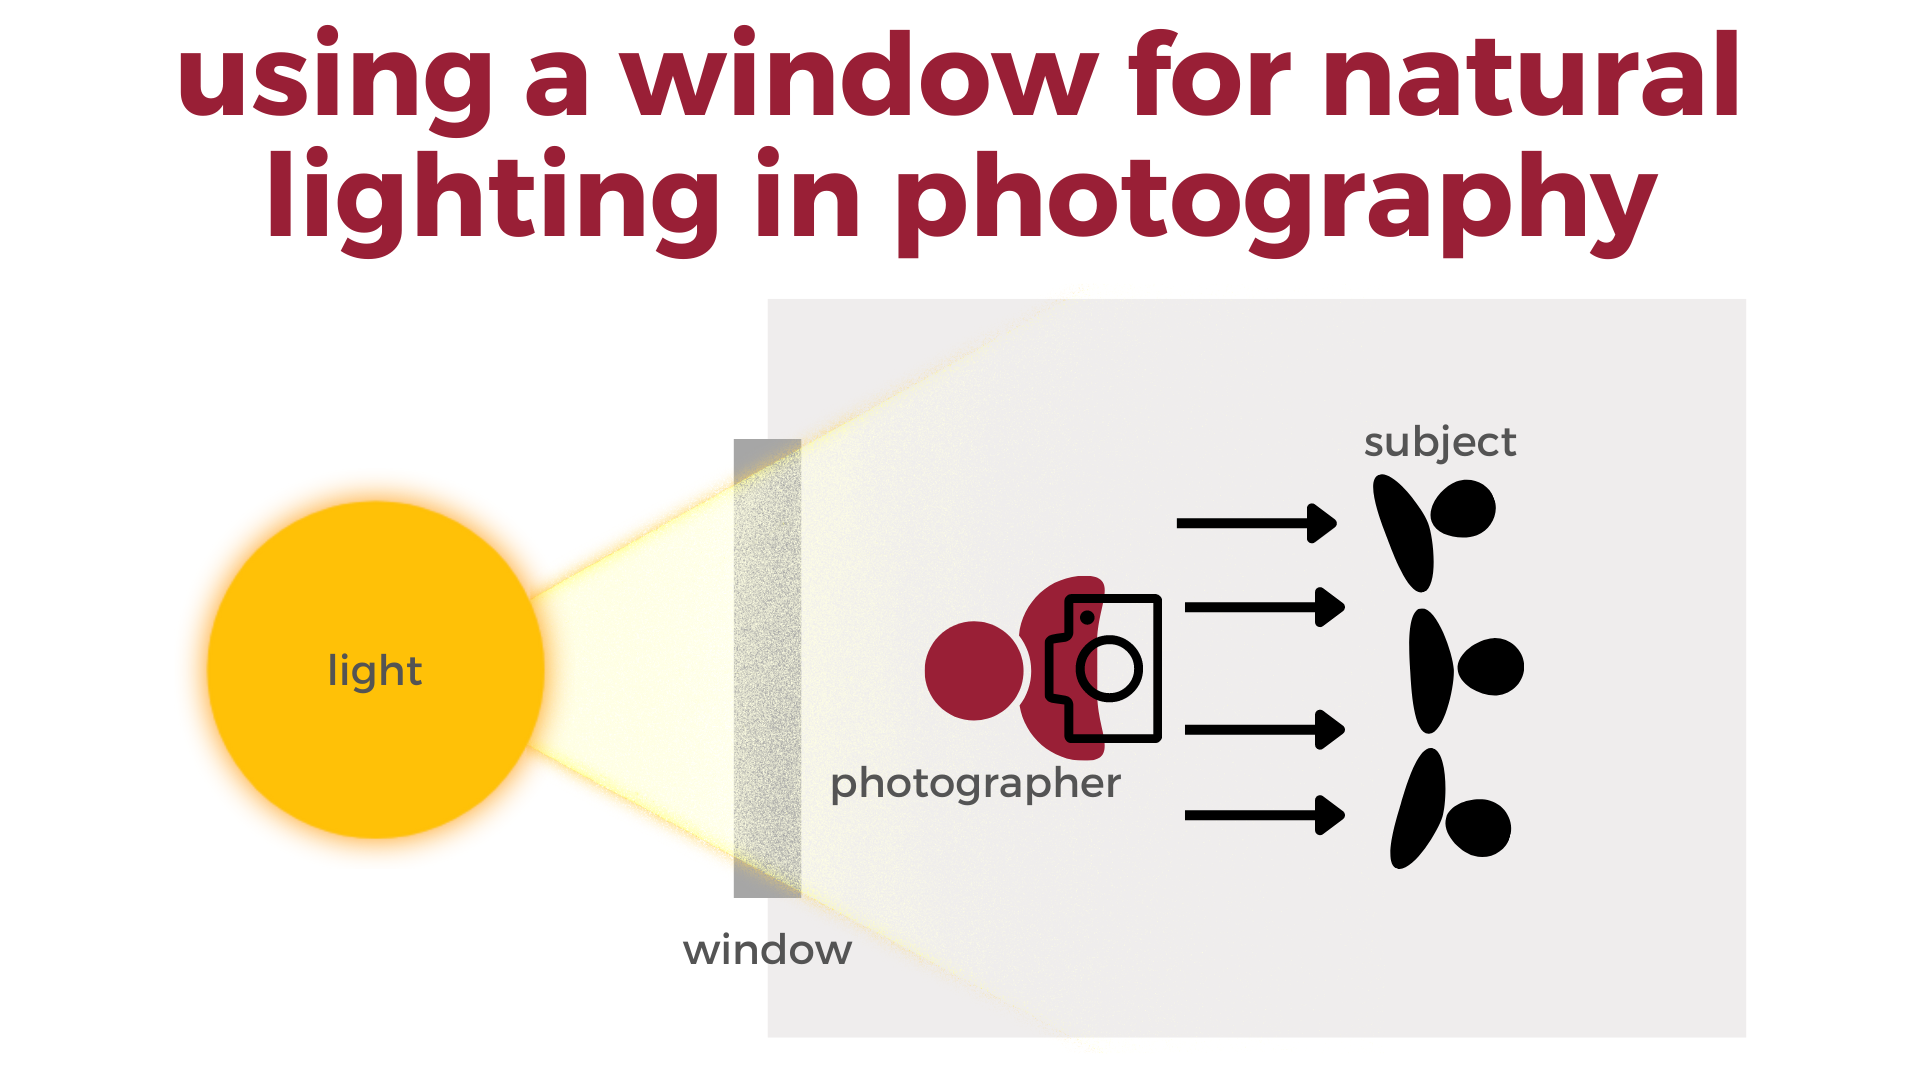
Diagram 1: Using a Window for Natural Lighting in Photography
A photographer stands between a window (lightsource) and their subject to capture a photo.
Below is an example of a photo that uses good natural lighting:

Image description: A group of smiling Family & Consumer Science agents show off their recently made cheese during a cheese-making workshop at Pulaski Technical College of Culinary Arts and Hospitality.
4. Clean Your Camera's Lens
This tip may seem obvious, but we can easily forget to clean the lens of our camera if we get into a hurry. But the quality of our photos really starts to go down with a smudged-up camera lens. To clean your phone's camera lens, use a microfiber cloth or a clean piece of soft cotton, such as a soft cotton t-shirt.
5. Don't Zoom In! Get Closer to Your Subject
When you are far away from the subject you are trying to capture, it can be extremely tempting use the zoom feature on your phone's camera. But zooming in on your subject lowers the quality of the photo in such a significant way that we recommend avoiding zooming in at all, unless you have no choice but to do so.
Instead, we recommend getting closer to your subject. This can sometimes feel a little awkward and can also be difficult to do if you are trying to capture a fleeting moment, but it just takes some practice.
6. Tap on Your Subject to Focus
Most camera phones allow you to manually focus on your subject by tapping on the subject on your screen. If your subject is out of focus or blurry, try tapping on what you want to focus on and see if that improves the issue.
7. Play Around with Different Angles
Good photography is all about two things: angles and lighting. When you are capturing a photo, walk around the area you are in to see if you can find a better angle. Changing the angle from which you are shooting photos allows you to capture multi-faceted moments as well as change the angle of the light source on your subject. Try standing in different places to capture your subject to get multiple photos, and choose the best from the bunch.
8. Rule of Thirds
Turn on the grid feature on your camera phone to show gridlines (make sure it's the 3x3 setting) and use that grid to take better photos!
The Rule of Thirds is a popular composition technique in photography that suggests if you line up your subjects on these gridlines, you will likely take better photos.
When using the Rule of Thirds, aim to place your subject along one or more of these lines, or line up your subject on the cross-section of two lines.
See an example below of the Rule of Thirds:

Image description: Howard Co. Family & Consumer Science Agent Jean Ince uses a food processor to make a sauce for her handmade raviolis during a pasta-making workshop at Pulaski Technical College of Culinary Arts and Hospitality. This photo was edited to add the 3x3 grid on top of the image.
9. Steady Shaky Hands
Do your hands sometimes shake, causing you to take blurry, out-of-focus, or poorly composed photos? Consider getting a tripod for your camera or rest your arm or hand against something sturdy such as a wall or a table. This can help to stabilize your phone and result in clearer photos.
10. Vertical or Horizontal?
We get this question a lot: "Do I need to shoot my photos vertically or horizontally?"
The answer: It depends. It depends on a lot of things such as where you are going to use the photo, why you're taking the photo, the subject, and much more.
The way I decide which position to hold my phone while I am shooting is this:
I assume my photos will be used for social media, particularly Story content. Photos and videos used in Stories need to be vertical for best effect, if possible. So, the default way I hold my phone is vertically.
As I am photographing my subject, I may run into a shot that I feel would be more appropriate as a horizontal shot—for example, if my subject is wider than it is tall. I would then turn my phone to get the shot, and then turn it back once I get the shot I'm trying to get.